Warning: You are viewing an older version of this documentation. Most recent is here: 42.0.0
Declarations of Compromise
Note
Declarations of Compromise were formerly known as STR Events prior U38.0.0
See also
If you want to know more about Declarations of Compromise ™, read this page.
Custom Declarations of Compromise
From the Hunting interface, it is possible to create custom Declarations of Compromise (DoC) that will appear in the Operational Center and be identified as custom Threats.
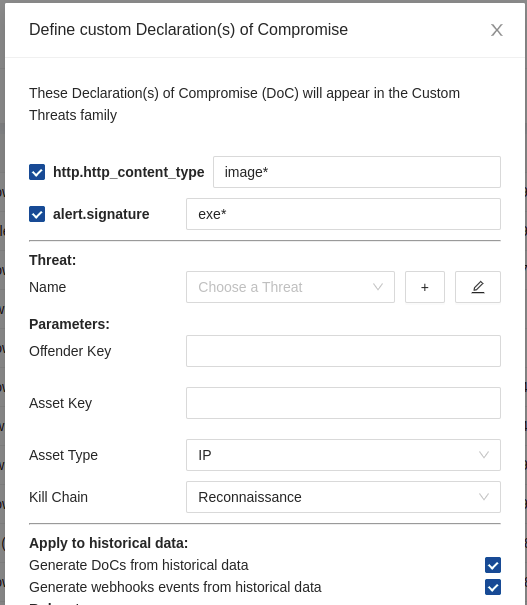
Once you have created a filter that matches a specific threat in your environment, click the Policy Actions dropdown and select Create DoC Event.

A modal will appear and let you configure the custom threat.
If the filter allows detecting an already existing threats, select that threat otherwise create a new threat by clicking on the + icon next to the Threat Name section.

Under the Threat Vector section, set:
The Offender Key to the field name that represents the attacking system such as
src_ipordest_ipThe Asset Key to the field name that represents the impacted asset such as
src_ipordest_ipThe Asset Type to describe the kind of impacted asset (IP, Username or Mail)
The Kill Chain phase translating the phase in which these alerts belong such as Command & Control for example
Then, you can decide to:
Generate Declaration of Compromise from historical data
Generate Webhook actions from those historical Declarations of Compromise
Finally, select one or more rulesets in which to deploy those changes.
Depending on your environment, the generation of historical events may take some time. The progression can be observed under Status of tasks with a task named create STR events from historical data (Probe Management > Appliances > Left Panel (Tasks) )
Important
Once a new Declaration of Compromise has been created, please update/push ruleset.
Note
Once created, a specific Policy action for that Declaration of Compromise will be created and can be seen under the Policies menu. You can delete custom Declarations of Compromise by simply deleting the associated policy.
Editing a Custom Declaration of Compromise
From the Radar interface, select Custom Threats under Families. You will be able to edit the name, the description and additional information of that threat. Note that the fields description and Additional Information are Markdown compatible and images can be embedded too as in this example:
# Example
This is a serious **Threat**

DoC Suppression
You may decide to suppress a Declaration of Compromise from appearing in the Operational Center. The suppression will be performed by combining a Signature ID and an IP address, or subnet, of an Offender.
To do so:
Go to Probe Management
Go to the Rulesets page
Click on Edit ruleset (ruleset where the DoC is deployed)
Under Expert mode, configure event suppression under Suppress events
Update/push ruleset in order to apply the suppression
suppress gen_id 2, sig_id 1002025885, track by_src, ip 107.182.230.25/8
The tracking can be either by_src, by_dst or by_either.
Note
gen_id corresponds to the gid of the signature, which is always 2 for Declarations of Compromise
Note
Variables can be used for the ip as well but make sure that this variable is defined on the probe settings
suppress gen_id 2, sig_id 1002025885, track by_either, $SCANNERS
Finding the sig_id
To find the sig_id required for the event suppression, go under Threat Radar and:
Open the Asset Table
Unfold the desired asset such as 10.7.5.101
Under the Detection Methods tab, identify the
sig_idof the appropriate signature as illustrated in the following screenshot

Find the Offender IP
To find the Offender IP required for the event suppression, go under Threat Radar and:
Go to Threat Family page
Select a Threat
Go to the Assets tab
Select Offenders from the Ctrl menu on the right of each impacted assets

