
Warning: You are viewing an older version of this documentation. Most recent is here: 42.2.0
Network Definitions
Network definitions are a very powerful capability of Stamus Central Server which allows labeling subnets or IP addresses into an organizational structure to add business context while analyzing alerts, network protocol, file transactions and flow logs.
In its spirit, network definitions are similar to what DNS is to IP addresses. For example, when an alert is emitted, it is way easier to work with an alert coming from the “DMZ located in New-York” rather than the IP address 192.168.3.45. That’s what network definitions are about.
Network definitions allow for powerful search and escalation possibilities that can give an answer such as: Is anyone in marketing from HQ in Paris on the 4th floor using insecure/degraded encryption?.
Introduction
A good network definition is composed of 2 root nodes only : Home and Internet as illustrated on the following screenshot.
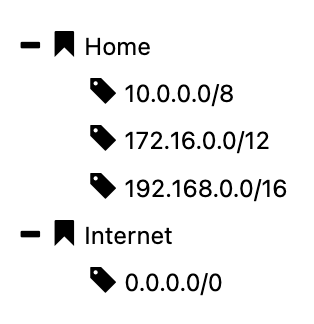
Note that this example will be using Home and Internet but these can be renamed to better fit your organization as illustrated hereafter.
Once network definition is in place, alerts are automatically enriched with this information as the following example shows it.
Note
If your network is not compliant with RFC1918, simply define your internal networks in Home as they are, this will work as expected.
What’s also interesting with network definitions is that we can have a tree view of our organization. For example, let’s imagine a company operating in 3 remote locations such as Paris, Nantes and New-York. The 2 first sites are in France and the latter is in the US. This could easily be translated as illustrated in the following screenshot.
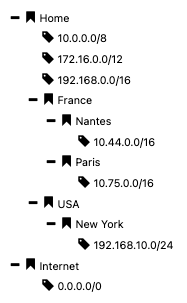
In this scenario, we have our “catch all” addresses at the top, the non-routable subnets (class A, B and C).
Note
All your subnets and IPs should be part of Home, including your public IP addresses.
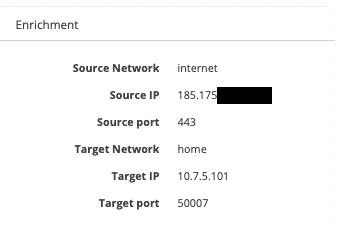
If an alert is emitted for a flow in between Paris and Internet for example, the enrichment will look like the following screenshot where the source and target networks are assembled using dots and spaces are replaced with underscores.
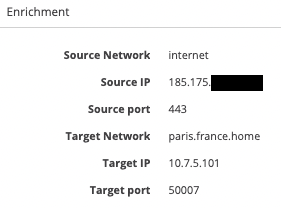
From an analysis standpoint, it is way easier to read that an alert is coming from “Paris, France”, than from “10.7.5.101”.
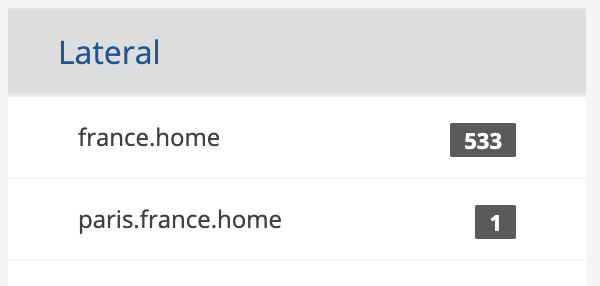
What’s also interesting with network definition is that lateral movement will be automatically identified in between organizational units. For example, if there is an alert between Paris and Nantes, then this will be highlighted as lateral on the main Hunting page as illustrated hereafter. In that case, Nantes and Paris being 2 organizational units under France, the common node is France so “france.home” will be highlighted. In the following screenshot, we can see that 533 alerts were emitted in between systems belonging to different groups under France. Similarly, seeing “paris.france.home” indicates that 1 alert what emitted between 2 systems both belonging to the Paris group.
Hint
If you have a complex network definition, with many levels of groups, focus on the shorter Lateral string as this indicates alerts between systems that are not really related to each other, which is intriguing.
Having that in place, we can leverage network definition in filters and create policies with them.

Here, this filter indicates “any alert from France”.
Important
Each subnet or IP address in the network definition must be unique. For example, one cannot have the subnet 192.168.1.0/24 in 2 different organizational units. If you are confronted with this situation, consider activating and operating in Multi-Tenancy mode.
Load balancers and proxies
Load balancers and proxies should be excluded from the HOME_NET in order not to miss detection.
Below are two options of how this can be achieved depending on the way the Network definitions have been created.
In both options below all detection events will have the Network Definition enrichment and proper alerting and detection will be achieved with the proxies and load balancers being considered as external network.
Option 1
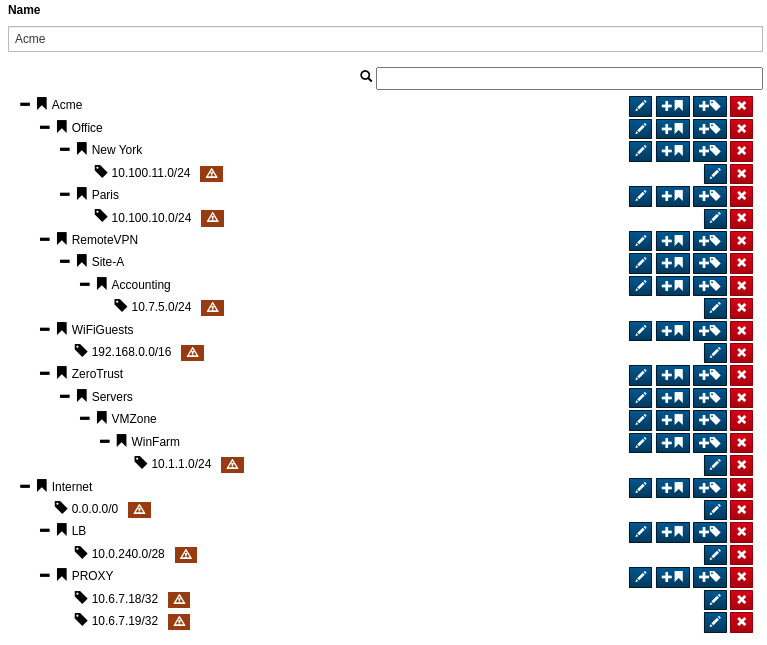
Using the following example network definition for the Acme company:
Enable the network definition on the probe as follows:
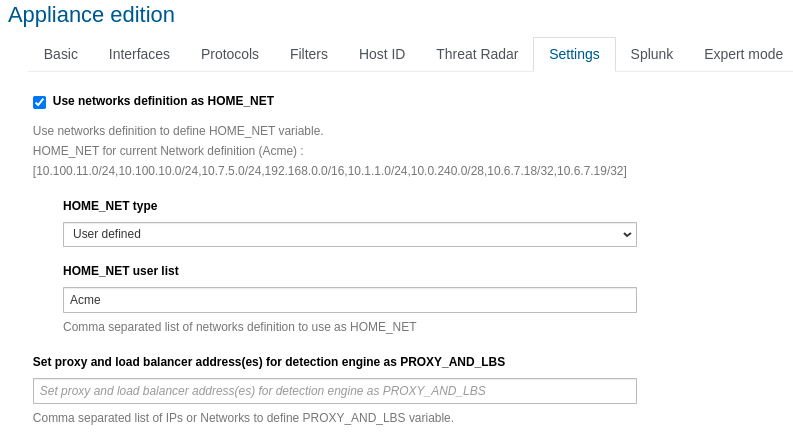
In the appliances Edit settings menu, Settings tab.
Option 2
Using the following example network definition for the A Organization:
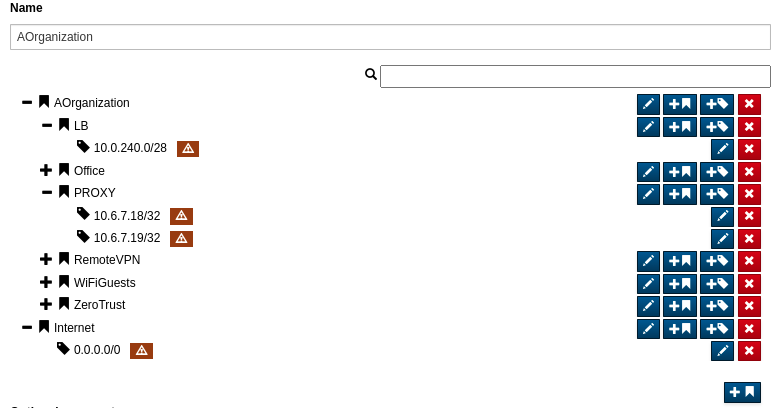
Enable the network definition on the probe as follows:
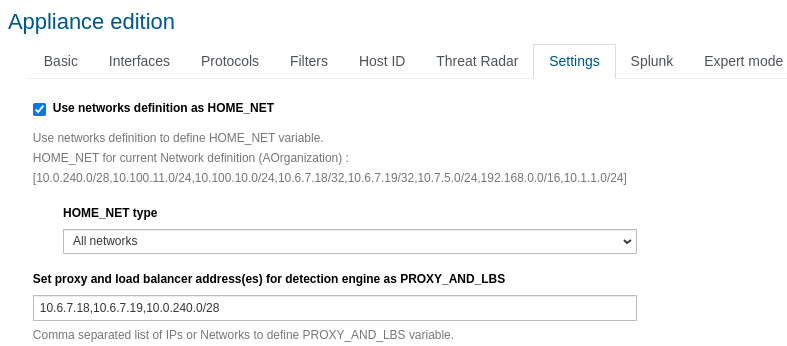
In the appliances Edit settings menu, Settings tab.
Managing Network Definitions
Create, Edit, Delete
To create, edit or delete a network definition, go under Administration, then Appliances from the header’s menu and select in the left side panel Network definitions.
To create a new one, simply click on Add new from the left side panel.
To delete an existing network definition, click on the “3 dots” on the right side of its name.
To edit an existing network definition, click on the edit button.
Import, Export
Network Definitions can be imported and exported.
To export a network definition, click on the “3 dots” next to the network definition you want to export and select export. You will obtain a JSON file that can later be imported.
Note
While the exported JSON file can be manually edited, be cautious to respect the appropriate structure.
To import a network definition back, select import from the left side panel:
Set the name of the network definition (it is not exported)
Set the format to Suricata
Select your json file
Import also supports Device42 file format which is a comprehensive IT infrastructure management software suite.
Using Network Definition as HOME_NET
Once you have created a network definition that represents your network, it can be assigned as your HOME_NET, and this is recommended.
In addition to enriching data and being used for lateral movement detection, this will ease your setup because you won’t have to adjust Suricata’s HOME_NET definition to fit your environment.
This option can be activated from the Settings tab under the Probe or Template settings by checking the box “Use networks definition as HOME_NET”. Once checked, select “User defined” for the HOME_NET type and define the top node of your network definition tree (here Home).
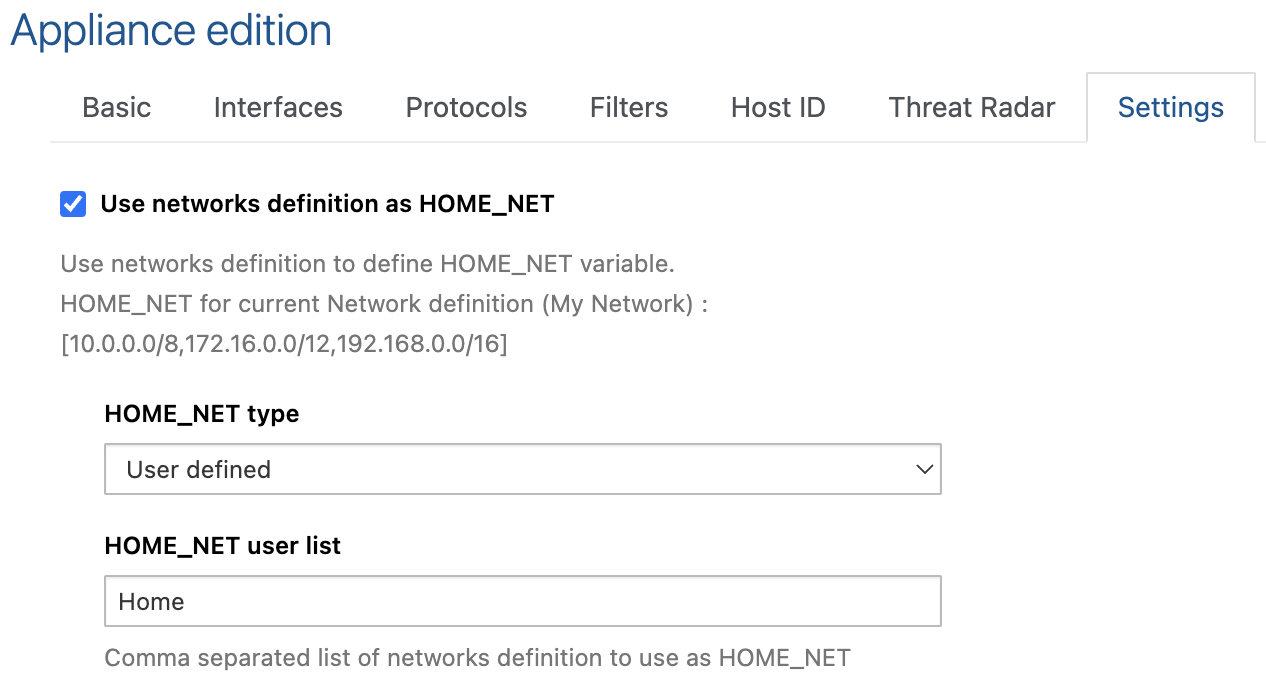
The network definition in this example is similar to the first one showcased on this page, with a root node named “Home” containing all defended subnets underneath it.
Note
The HOME_NET type can also be set to All networks. Choose this option if your network definition doesn’t define “Internet” (0.0.0.0/0) and only contains addresses and subnets that belong to your organization.
Assigning a Network Definition
Depending on your architecture, single or multi-tenant, assigning a network definition has different meanings.
Single Tenant (default)
In a single tenant environment, network definitions can be assigned to any number of your probes. In this scenario, a network definition can also be defined into a template that is used by your network probes.
Important
Only one network definition can be assigned to a network probe or a template (i.e. using multiple network definitions on a single network probe is not possible).
Network Probe
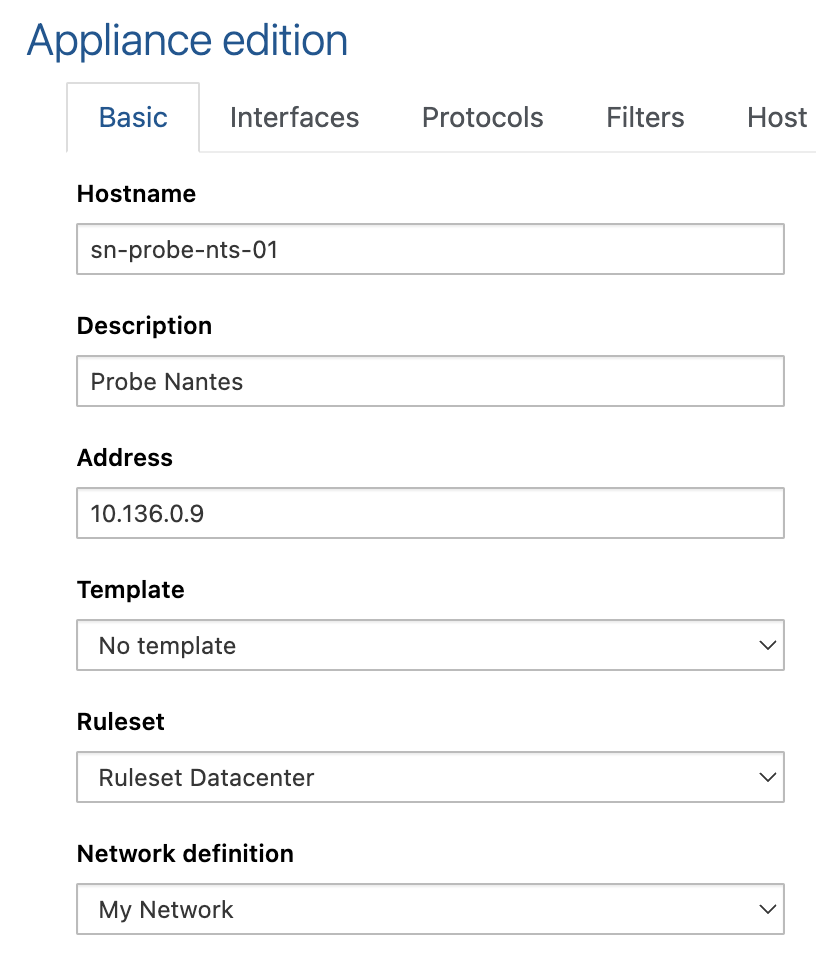
To assign a network definition to a Network Probe, go under Appliances and edit the desired Network Probe you want to assign the network definition to.
Select the Basic tab, select the appropriate Network definition and Submit the changes.
Terminate by applying changes to deploy the configuration to the network probes.
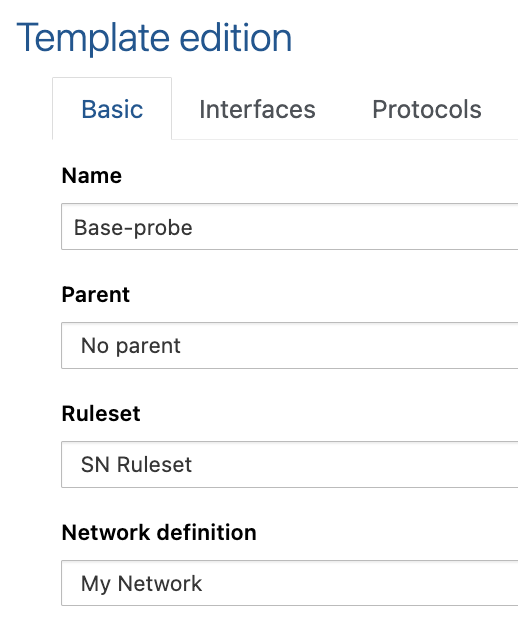
Template
To assign a network definition to a Template that will be used by Network Probes, go under Appliances and select Template list from the left side menu.
Edit the template you want to assign the network definition to and from the Basic tab, select the desired network definition and click on Submit.
Terminate by applying changes.
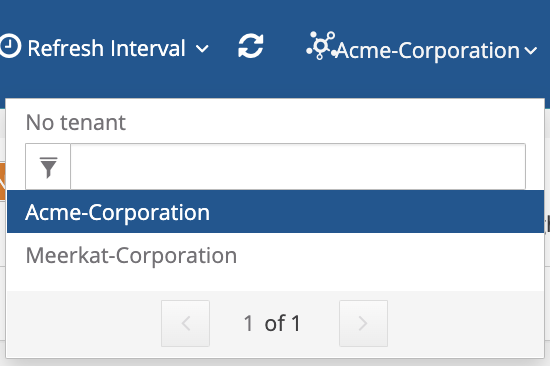
Multi-Tenancy
In a multi-tenant setup, each tenant has a unique network definition which translates a specific customer environment or a business unit.
The name of the network definition becomes the name of the tenant selectable from the tenant dropdown menu in the header. For example, if we created 2 network definitions respectively named Acme-Corporation and Meerkat-Corporation, we would be presented with the following menu.
Please refer to this page to activate multi-tenancy.
JSON Example
RestAPI
Network definitions can be uploaded and updated regularly via secure RestAPI. This example uses the curl utility but any other tool or programming language can be used. In the example below substitute ${MANAGER_IP} with the Stamus Central Server ip or domain name in your setup. The security token is issued and can be regenerated per user from User settings , click Edit token. The $JSON variable is actually the Network Definitions filename.
Bash Example
curl -k ${CURL}  https://${MANAGER_IP}/rest/appliances/network_definition/import_file/ -H "Authorization: Token $TOKEN" -H 'Content-Type: multipart/form-data' -F 'file=@'"$JSON"'' -F 'name='"${NETDEF_NAME}"'' -F 'format=suricata'

NETDEF_PK=$(curl -k -s ${CURL} https://${MANAGER_IP}/rest/appliances/network_definition/ -H "Authorization: Token ${TOKEN}" -H 'Content-Type: application/json' -X GET |  jq -r '.results[] | select(.name == "'${NETDEF_NAME}'") | .pk')

curl -k ${CURL} https://${MANAGER_IP}/rest/appliances/stamus_probe/${PK_APPL}/ -H "Authorization: Token ${TOKEN}" -H "Content-Type: application/json" -X PATCH -d '{"overriden_fields": ["network_definition"],"network_definition":"'"${NETDEF_PK}"'"}')

PK_APPL=$(curl -k ${CURL} https://${MANAGER_IP}/rest/appliances/appliance/ -H "Authorization: Token ${TOKEN}" -H 'Content-Type: application/json' -X GET | jq -r '.results[].appliance_id')

curl -k ${CURL} https://${MANAGER_IP}/rest/appliances/stamus_probe/$PK_APPL/apply_changes/ -H "Authorization: Token ${TOKEN}" -H 'Content-Type: application/json' -X POST -d '{}'
Python Example
import requests

def check_request(response):
   if response.status_code == 200:
      print("Request is successful!")
      print("Response:")
      print(response.text)
   else:
      print(f"Request failed with status code: {response.status_code}")

def upload_network_definition():
   print("Upload network definition")
   url = "https://<MANAGER_IP>/rest/appliances/network_definition/import_file/"
   token = "<token>"  # Your token value
   file_path = "/path/to/netdef.json"

   files = {
      "file": open(file_path, "rb"),
      "name": (None, "netdef"),
      "format": (None, "suricata")
   }

   headers = {
      "Authorization": f"Token {token}"
   }

   response = requests.post(url, files=files, headers=headers)
   check_request(response)

def probe_pk():
   print("Get PK of Probe")

   url = "https://<MANAGER_IP>/rest/appliances/appliance/"
   token = "<token>"  # Your token value

   headers = {
      "Authorization": f"Token {token}"
   }

   response = requests.get(url, headers=headers)

   check_request(response)
   response = response.json()
   print(response)
   results = response["results"]
   return results[0]["appliance_id"]

def netdef_pk():
   print("Get PK of network definition")

   url = "https://<MANAGER_IP>/rest/appliances/network_definition/"
   token = "<token>"  # Your token value

   headers = {
      "Authorization": f"Token {token}"
   }

   response = requests.get(url, headers=headers)

   check_request(response)

   response = response.json()
   print(response)
   results = response["results"]
   return results[0]["pk"]

def attach_netdef_to_probe(probe_pk, netdef_pk):
   print("Attach network definition to probe")

   url = "https://<MANAGER_IP>/rest/appliances/stamus_probe/%s/" % probe_pk
   token = "<token>"  # Your token value

   headers = {
      "Authorization": f"Token {token}"
   }

   payload = {
      "overriden_fields": ["network_definition"],"network_definition":netdef_pk
   }

   response = requests.patch(url, headers=headers, json=payload)

   check_request(response)

def apply_changes_probe(probe_pk):
   print("Apply changes on Probe")
   url = "https://<MANAGER_IP>/rest/appliances/stamus_probe/%s/apply_changes/" % probe_pk
   token = "<token>"  # Your token value

   headers = {
      "Authorization": f"Token {token}"
   }

   response = requests.post(url, headers=headers)

   check_request(response)

if __name__ == "__main__":
   upload_network_definition()
   probe = probe_pk()
   netdef = netdef_pk()
   attach_netdef_to_probe(probe, netdef)
   apply_changes_probe(probe)
Updating Network Definitions
The below example uses Python to update and push existing network definitions:
import requests

def upload_network_definition():
    url = "https://192.168.0.1/rest/appliances/network_definition/import_file/"
    token = "<token>"  # Your token value
    file_path = "/home/user/Downloads/Default.json"

    files = {
        "file": open(file_path, "rb"),
        "name": (None, "netdef"),
        "format": (None, "suricata")
    }

    headers = {
        "Authorization": f"Token {token}"
    }

    response = requests.post(url, files=files, headers=headers)

    if response.status_code == 200:
        print("File upload successful!")
        print("Response:")
        print(response.text)
    else:
        print(f"File upload failed with status code: {response.status_code}")

def apply_changes_scs():
    url = "https://192.168.0.1/rest/appliances/task/apply_manager_changes/"
    token = "<token>"  # Your token value

    headers = {
        "Authorization": f"Token {token}"
    }

    response = requests.post(url, headers=headers)

    if response.status_code == 200:
        print("Apply changes request is successful!")
        print("Response:")
        print(response.text)
    else:
        print(f"Request failed with status code: {response.status_code}")

if __name__ == "__main__":
    upload_network_definition()
    apply_changes_scs()
Known Bug
As of U38.0, there is a UI bug that displays a brown triangle next to the subnets or IP addresses indicating that the address is invalid. While this is disturbing, this is just a UI glitch and the underlying logic works. Simply ignore this warning, this will be fixed soon.