
Warning: You are viewing an older version of this documentation. Most recent is here: 42.2.0
Analyzing Violations
Declaration of Policy Violation®
Overview
Declarations of Policy Violations® (DoPV) are a high-precision event category within the Clear NDR® Central Server Platform, designed to identify and alert on unauthorized activities and policy violations in your network.
Similar to Declaration of Compromise® (DoC), DoPVs focus on specific policy breaches, such as the use of clear text passwords, outdated TLS versions, Exired TLS certificates, outdated and legacy protocols, insecure cipher suites, TOR browser usage and other.
Important
Any DoPV event, including custom defined ones, as well as any detection event is accompanied by its corresponding Evidence.
Key Features
High-Fidelity Alerts: DoPVs provide clear and actionable notifications for specific policy violations, helping security and IT teams to identify issues promptly.
Custom DoPVs: Users have the ability to create custom DoPVs to monitor policy violations that are unique to their organization’s requirements.
Proactive Security: By receiving precise alerts on policy breaches, teams can quickly address these issues to prevent them from escalating into security incidents or breaches.
DoPVs empower your security and IT teams with the visibility and control needed to enforce policy compliance across the organization, ensuring a stronger security posture and reducing the risk of breaches due to policy violations.
Continuous Compliance and Security Audits
The power of the DoPV is that it gives security, governance, and risk personnel a continuous and real-time understanding of significant policy violations taking place in their organizations.
Unlike Declarations of Compromise (DoC) which alert organizations to high-priority threats, DoPVs focus on unauthorized activities or policy violations that may not necessarily be malicious but still pose a risk to the organization.
Examples may include insecure protocols, outdated TLS versions, expired TLS certificates, vulnerable systems, software, TOR browser usage, or unencrypted (clear text) passwords. These fall largely into two families of detections:
Adware – This detection family identifies unwanted software designed to display advertisements to users, most often within a web browser. These are dangerous because they can become weaponized
Potential Data Leakage – This detection family identifies security vulnerabilities and risky behaviors that could lead to unauthorized data exposure or exfiltration. The detections focus on conditions that create pathways for sensitive information to leave the organization through insecure channels or compromised systems.
You can see more detailed examples from the Potential Data Leakage family coverage here:
How to Identify DoPVs in Clear NDR® User Interface
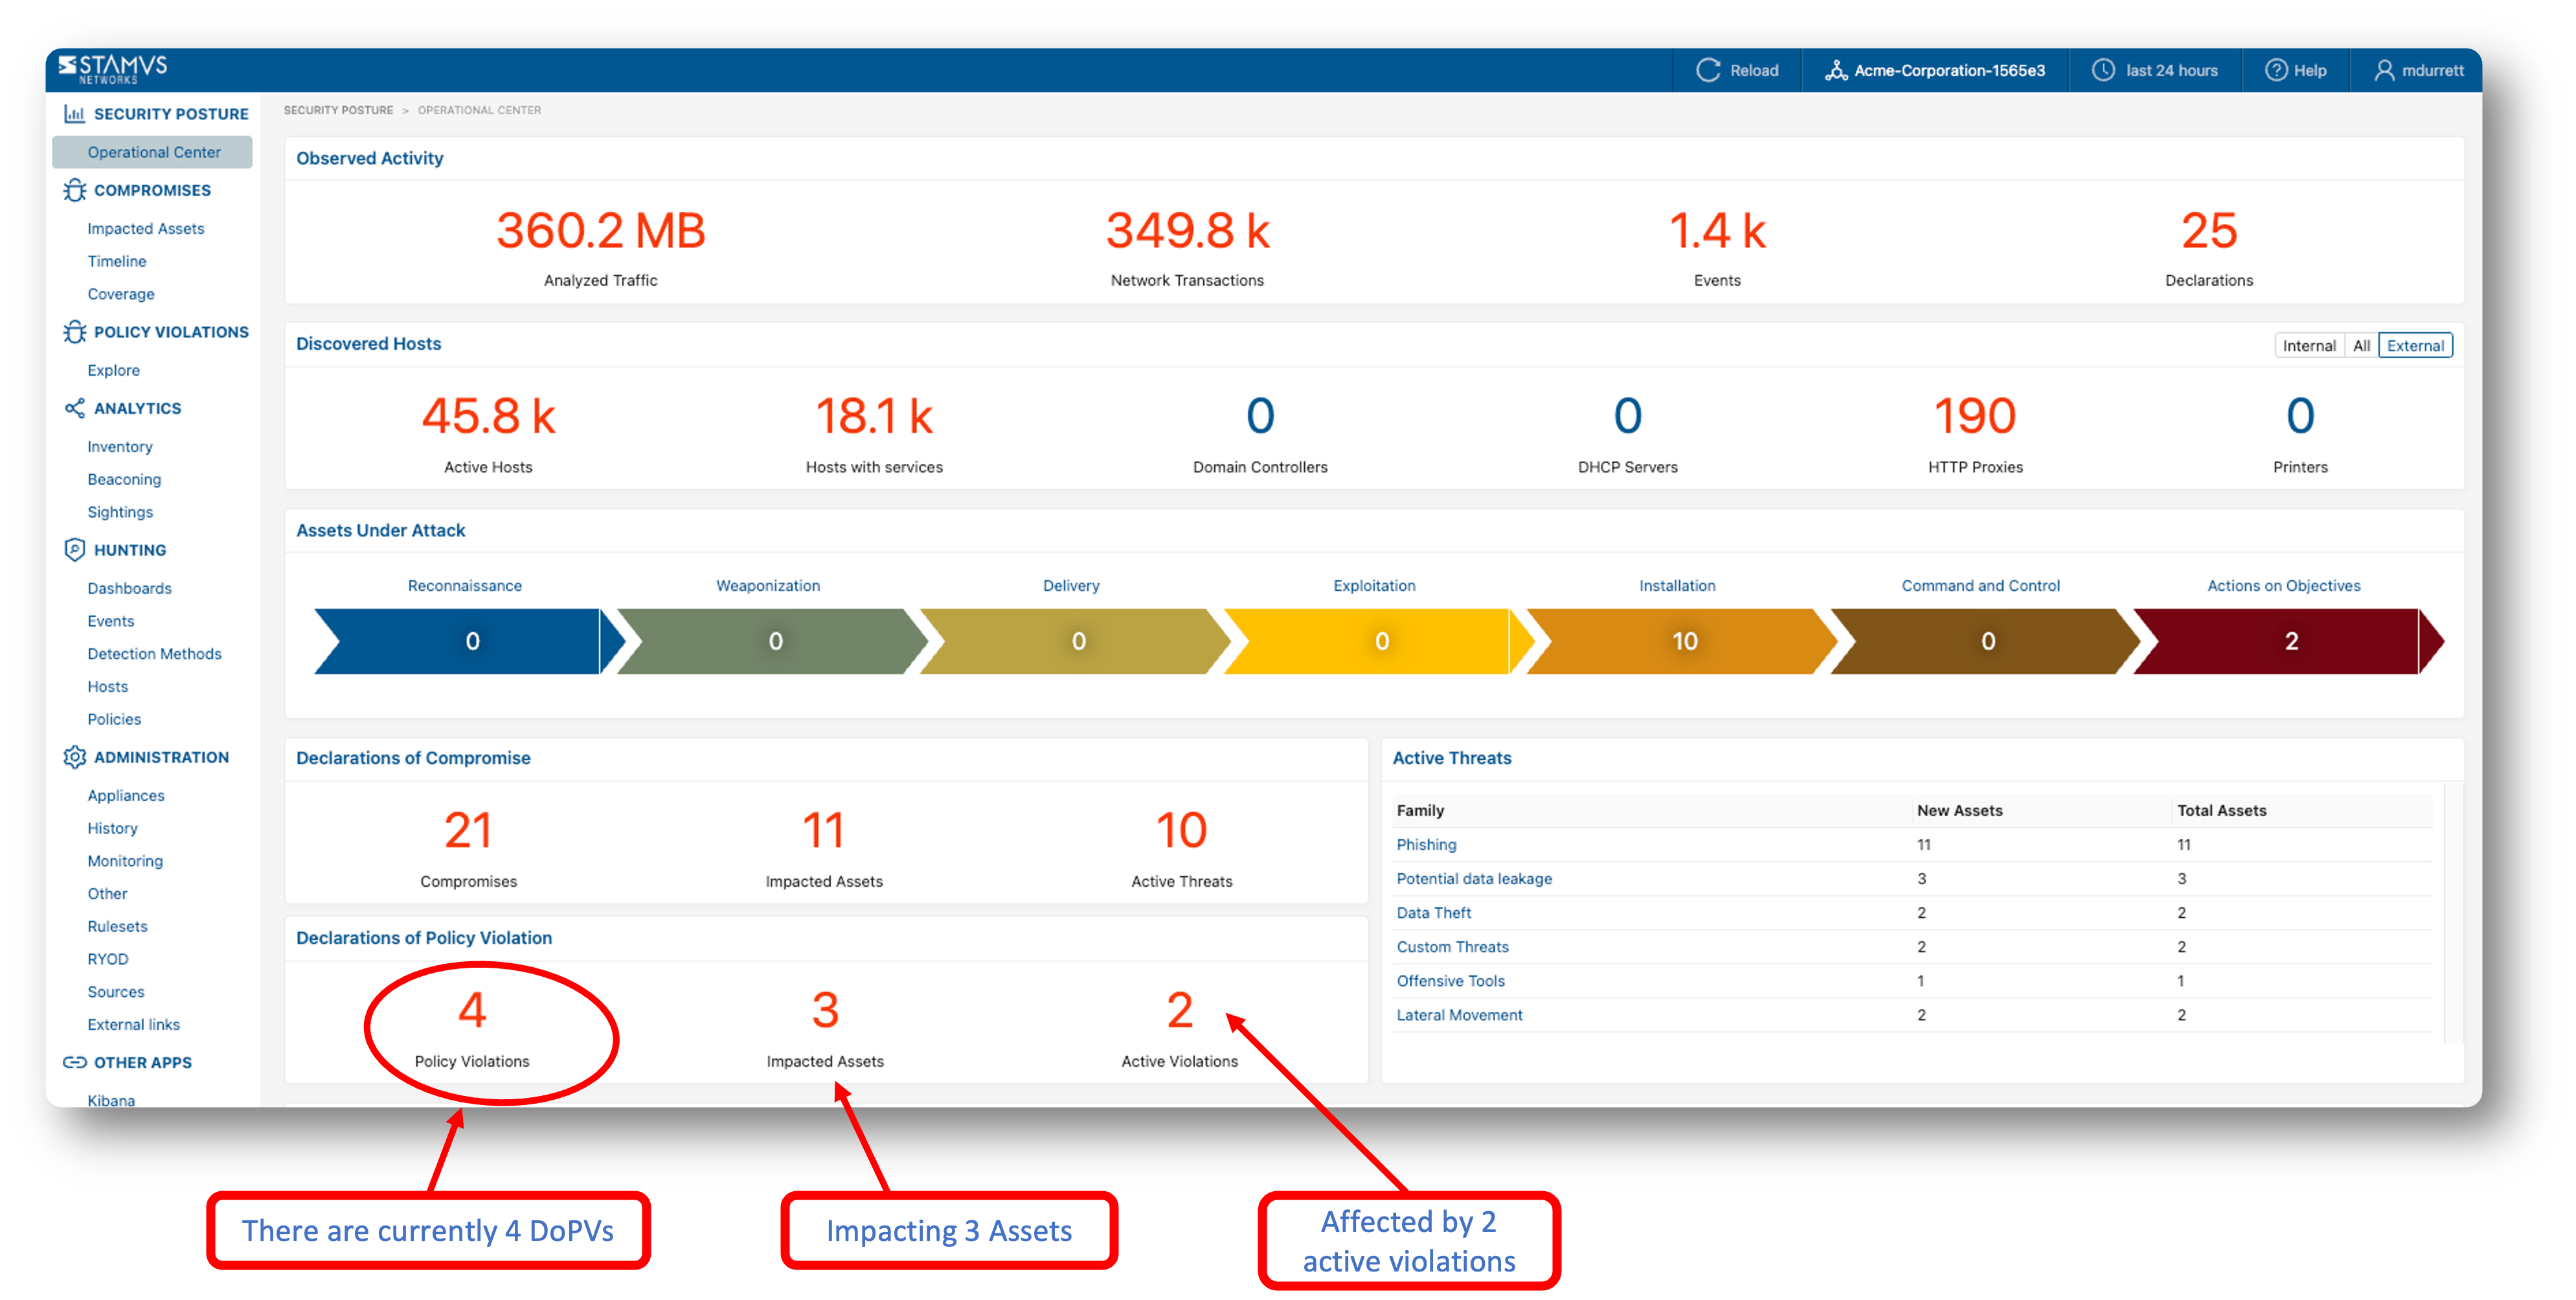
You may start an investigation into a policy violation from the Operations Center. Click on Declaration of Policy Violations (Policy Violations)
Custom DoPVs
In addition to those built-in and included in the daily threat detection updates, users may create their own through a process known as escalation, whereby the results of an investigation or hunt can be turned into a DoPV rule. These custom DoPVs are built using the filters and may be used for real-time policy violation detection on future network traffic or applied retroactively to historic data. More information can be found here Custom Declarations of PoPV
Viewing the DoPVs in the Hunt and Investigation Console
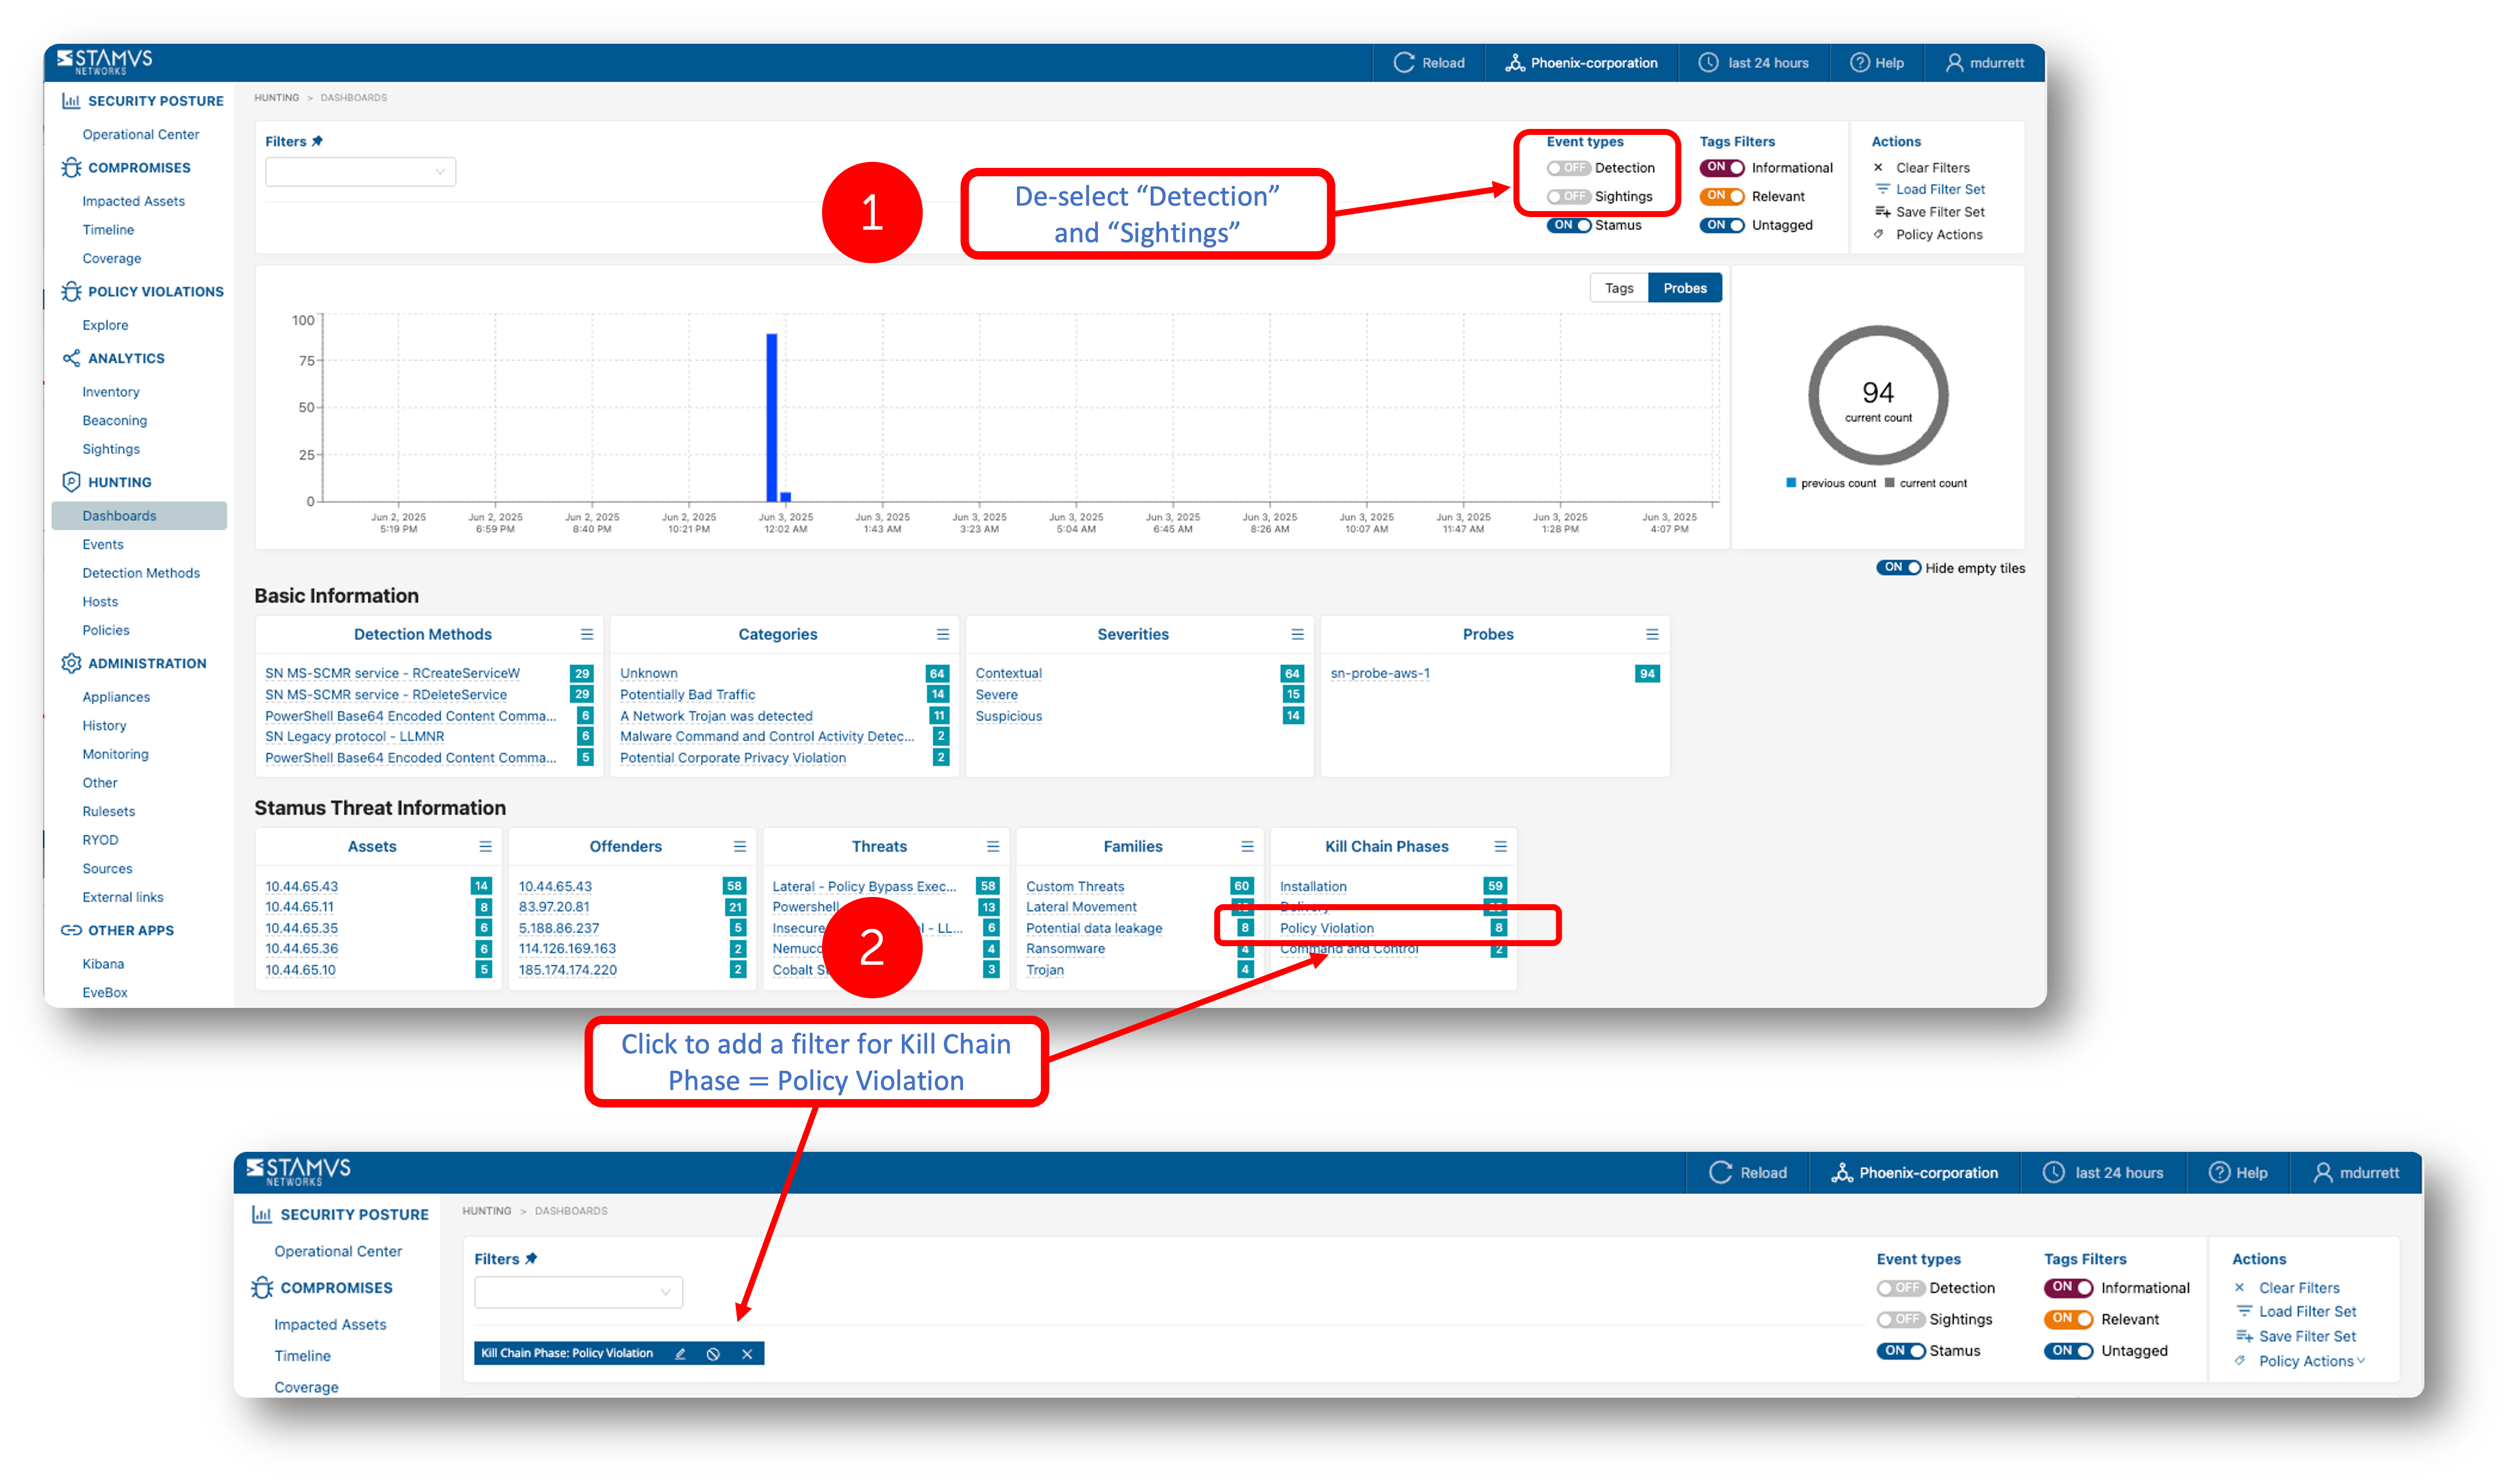
To view all DoPVs from Clear NDR® Hunting dashboard, toggle the event type Detection and Sightings to the off position, add a filter to add the events in the policy violation phase of the kill chain. See instructions below.
How to Identify a DoPV Event Using a SIEM Query
Below is an example of how to query your SIEM for a DoPV.
Note
The query uses
Event Type \= Stamusand the DoPV qualifier:Stamus eventsthat are not associated with a kill chain phase. This query and results are valid for U42 and later releases.
Query:
"event_type":"stamus" + "kill_chain":"pre_condition" + unique asset_info.incident_id
This will return the DoC JSON log entry that includes Stamus Event information. See example below.
"stamus": {
  "extra_info": null,
  "source": "212.193.30.21",
  "family_name": "Adware",
  "incidents_id": [118],
  "threat_id": 1058,
  "asset_net_info": "wifi-users-hq.organization-acme",
  "pk": 1218,
  "asset_info": {
    "last_seen": "2025-07-24T03:36:27.077767Z",
    "event_id": 183,
    "first_seen": "2025-07-24T03:36:27.077767Z",
    "incident_id": 118,
    "kill_chain": "pre_condition",
    "state": "new"
  },
  "method_id": 1002010595,
  "family_type": "family",
  "event_id": 183,
  "offender_type": "ip",
  "asset_type": "ip",
  "family_id": 23,
  "threat_name": "Potentially Unwanted Program",
  "asset": "192.168.100.238",
  "kill_chain": "pre_condition"
}
Note
This query returns only the first Stamus Event that triggered a DoPV.
Important
For detailed explanation of each field please refer to Stamus Events
DoPV Page
Explore Page
The Explore page provides an overview of various categories of policy violations within the network, including Adware, Custom Policy Violations, and Potential Data Leakage. Each category displays key metrics such as:
New Victims: The number of new assets affected by the specific policy violation.
Covered Policies: The total number of policies associated with each violation type.
Detection Methods: The methods used to identify the violations, with counts indicating their usage.
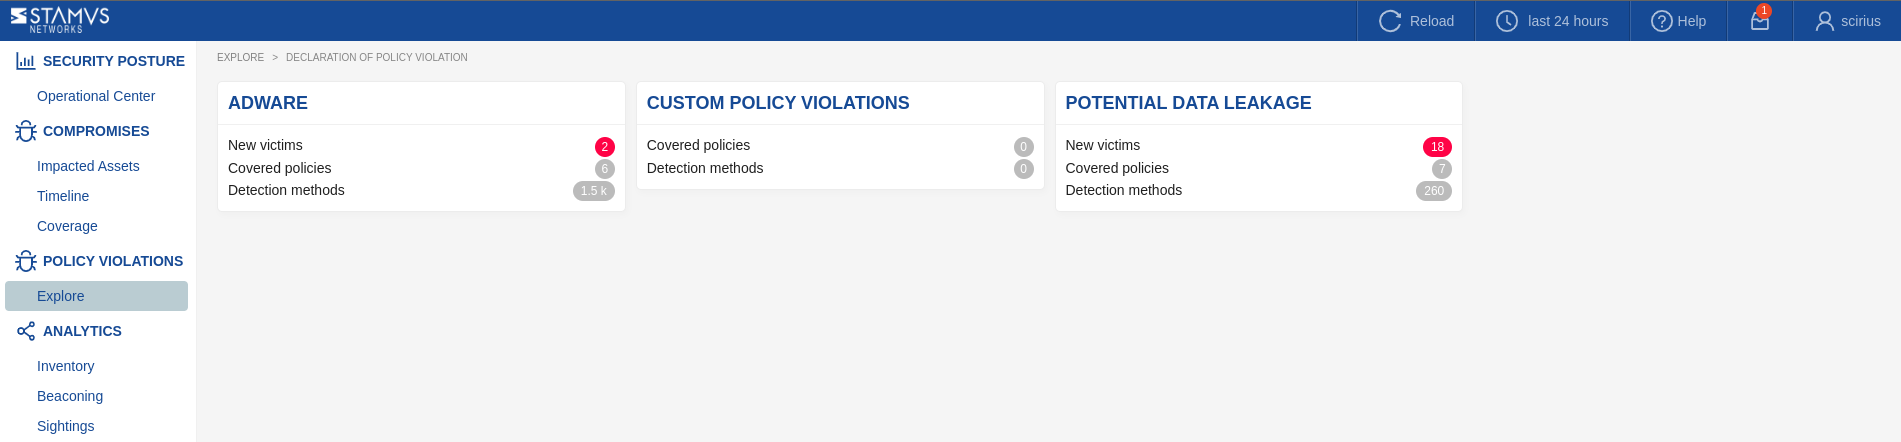
This page facilitates quick assess to the current state of policy violations and understanding the scope and impact of each category within the network.
From the Explore page, you can easily navigate to each category of interest.
Policy Violation Families Pages
Each Policy Violation Family page provides insights into specific threat families related to policy violations within your network. This page is organized into three main tabs:
- Assets Tab: Lists all assets affected by the selected threat family. It includes:
Asset Type: Displays the type of assets involved, such as IP addresses.
DoPV/DoC Threats: Shows associated threats linked to the threat family.
Seen Dates: Records the first and last seen dates of each asset concerning the threat.
Roles and Network Info: Provides additional context about the assets, including their roles within the network and related network information.
- Metadata Tab: Provides detailed information about the specific IPs and hosts affected by the threat family. It includes:
IPs and Hosts: Lists the impacted IP addresses and hostnames.
Policy Violations: Identifies the specific policy violations associated with each IP or host.
First and Last Seen: Shows when these violations were first detected and when they were last observed.
Additional Details: Such as protocols and geographical locations, offering a broader context of the threat’s scope and impact.
- Network Tree Tab: Offers a visual representation of the network infrastructure related to the threat family. It displays:
Hierarchical Relationships: Illustrates how different nodes are connected within the network, highlighting the flow and root of the policy violations.
Interactive Elements: Helps users pinpoint critical nodes and understand the spread of the threat within the network.
Each tab on the Threat Family page provides valuable data that aids in understanding, tracking, and managing the threat family across your organization’s network.
Additional Features:
- Investigate Events Button:
Located at the top right corner, this button allows you to dive deeper into the threat data by automatically applying a threat family filter and redirecting you to the Dashboards page. Here, you can explore all relevant information related to this threat family.
You can navigate to specific pages like Hosts, Events or Detection Methods for further investigation and targeted actions. Also available in the Events page are the evidence logs and data that can include any related flow records, anomalies, alerts, protocol transactions, and file transaction logs, plus file extraction, packet capture (PCAP) and the detection logic of a specific event.
- Threat Family Variants:
Below the main description, the page may display different variants of the threat family, such as specific types of unwanted programs or adware variants. Each variant is listed with associated metrics like the number of methods, last seen dates, and version information, allowing you to distinguish between various subcategories of the threat.
- Filters and Sorting:
The filter input field allows you to refine the displayed data by applying filters based on asset type, threat, date ranges, and more. This helps in narrowing down the data to focus on specific aspects of the threat family that are most relevant to your investigation.
Data in the Assets table can be sorted by columns such as asset type, first seen date, last seen date, providing flexibility in how you view and prioritize the information.
- Export Options:
The Metadata tab provides an export function (in csv format), allowing you to download the displayed data for offline analysis or reporting purposes. This can be particularly useful for documenting findings or sharing insights.
Each element of the Threat Family page is designed to provide detailed, actionable insights into the nature and impact of Policy Violations associated with specific threat families, enabling effective monitoring and response strategies.
See also
If you want to know more about enabling/disabling threat families and threats with regards to Declarations of Policy Violations ™, read this section.
Investigation Routines for DoPV
In simple terms, a Declaration of Policy Violation (also known as a DoPV) are high-confidence security incidents related to the predefined security policy of your organization and activities you have set as unauthorized. These are similar to the Declarations of Compromise (DoCs) that you are likely already familiar with, but unlike a DoC which is triggered by a threat on an asset, DoPVs are triggered by unauthorized activities or policy violations such as clear text passwords, vulnerable systems, outdated TLS versions, insecure cypher suites, TOR browser usage legacy protocols and similar.
Step 1: Review the DoPV List
Objective: Identify network traffic that violates defined security policies, potentially indicating misconfigurations, insider threats, or attempts to bypass security controls.
Access the DoPV Interface: Navigate to the Policy Violation -> Explore section in the Clear NDR interface.
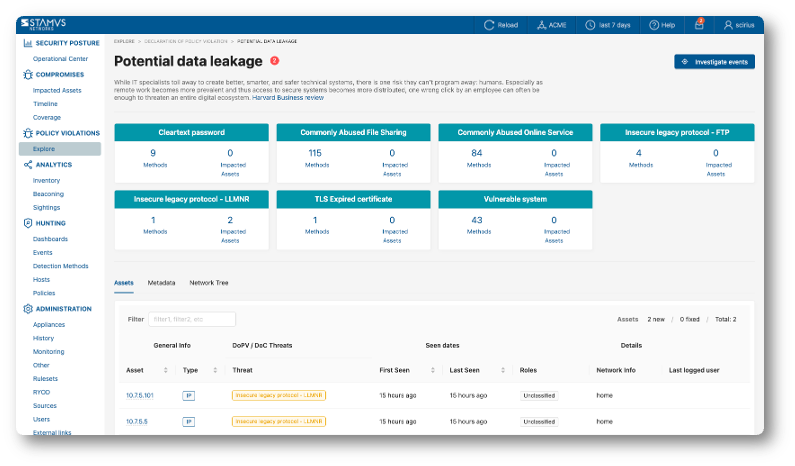
The screenshot below is an example of Potential Data Leakage DoPVs in the Policy Violations view:

Review the DoPV List: Examine the list of DoPVs, focusing on:
Category: Understand the type of policy violation (e.g., Adware vs Potential Data Leakage).
Asset: review the IP(s) of the asset where the violation was detected.
Role: Take into account the role of the particular asset when starting the investigation. For example, if a domain controller is under attack, this is the priority and a particular attention should be paid to this asset when doing the threat hunting.
First Seen / Last Seen: Determine the timeline of the activity. Recent and ongoing DoCs should take precedence.
Network Info: take into account which part of the network the violation is originating from.
Prioritize: Adware DoPVs should be prioritized for investigation if present on an internal host.
Step 2: Prioritize
Objective: Prioritise DoPV groups or events for investigation.
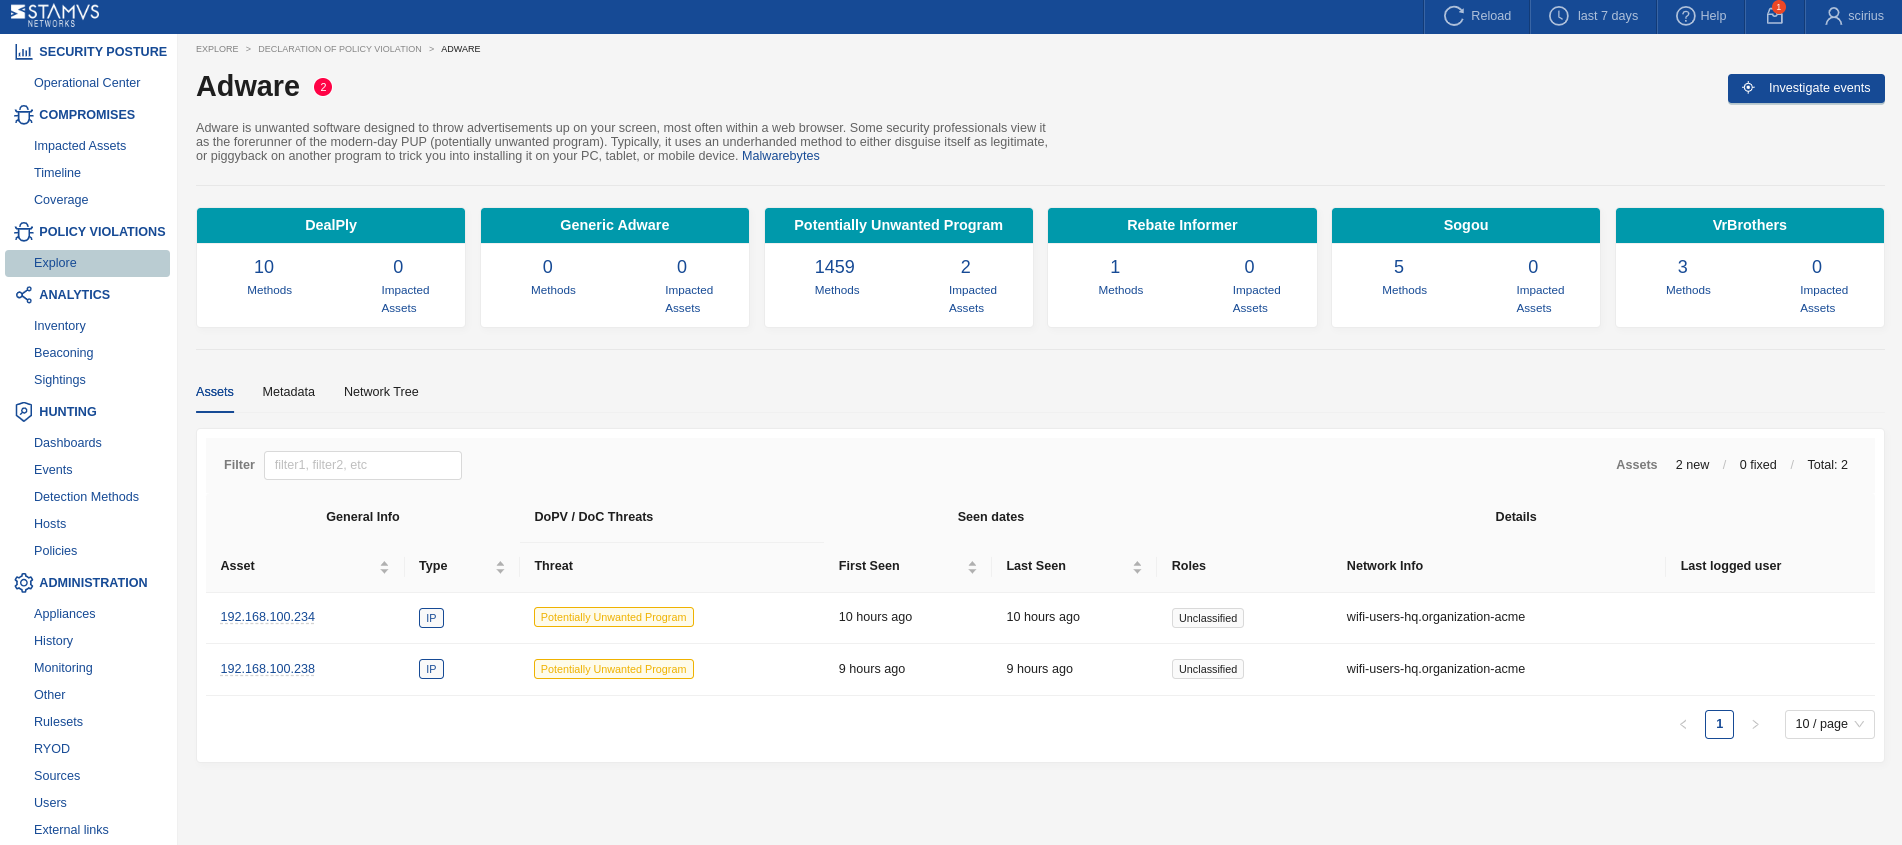
Example of DoPVs view with Adware present:

Prioritize Investigation: Focus on high-severity DoPVs, especially those involving critical assets or policies designed to prevent known attack vectors. Recurring violations might indicate persistent attempts to bypass controls. Investigating ADWARE DoPVs first is recommended
Investigate Legitimate Exceptions: Determine if the policy violation is due to a legitimate business need or a misconfiguration of the policy itself. Document any valid exceptions.
Step 3: Reporting
The main purpose of DoPVs is to help out the Compliance and Security policy implementations.
DoPVs can also be customized and tailored to the specific organizational needs.
Any specific DoPV group can easily be identified and reported on in Hunting -> Dahsboards -> Kill chain Policy Violation.
The example below shows such DoPV occurrences evidence in the Hunting Dashboards :
Remediation and Lessons Learned
Another important Clear NDR capability gives users the ability to contain the threats it detects and the ability to improve future detection and prevention.
Remediation and Containment
Based on the findings of the investigation, take appropriate remediation steps, such as:
Isolating compromised hosts.
Blocking malicious communication.
Removing malware.
Patching vulnerabilities.
Resetting compromised user accounts.
Review and Refine Security Policies
Analyze the DoPVs to identify areas where security policies might need to be adjusted, strengthened, or created to better reflect the organization’s security posture and address identified risks.
Tune Clear NDR Detection and Configurations
Based on the threat hunting findings, create suppression rules to remove the noise (ie: false positives), create tagging policies to automatically classify events as either informational or relevant, and elevate the results of your hunting sessions and investigations to DoC and DoPVs to strengthen your security posture.
Document Findings and Lessons Learned
Thoroughly document the threat hunting process, findings, remediation steps, and lessons learned. This information is valuable for future investigations and for improving the overall security posture.
By following this detailed methodology, security teams can effectively leverage Clear NDR, particularly its Declarations of Compromise and Policy Violation features, to proactively hunt for threats, respond to security incidents, and continuously improve their network security defenses. Remember that threat hunting is an iterative process, and the specific steps and tools used may need to be adapted based on the organization’s environment and the nature of the threats being investigated