
Warning: You are viewing an older version of this documentation. Most recent is here: 42.2.0
Sources & Rulesets
Overview
The following diagram illustrates how Stamus Central Server manages and deploy sources and rulesets.
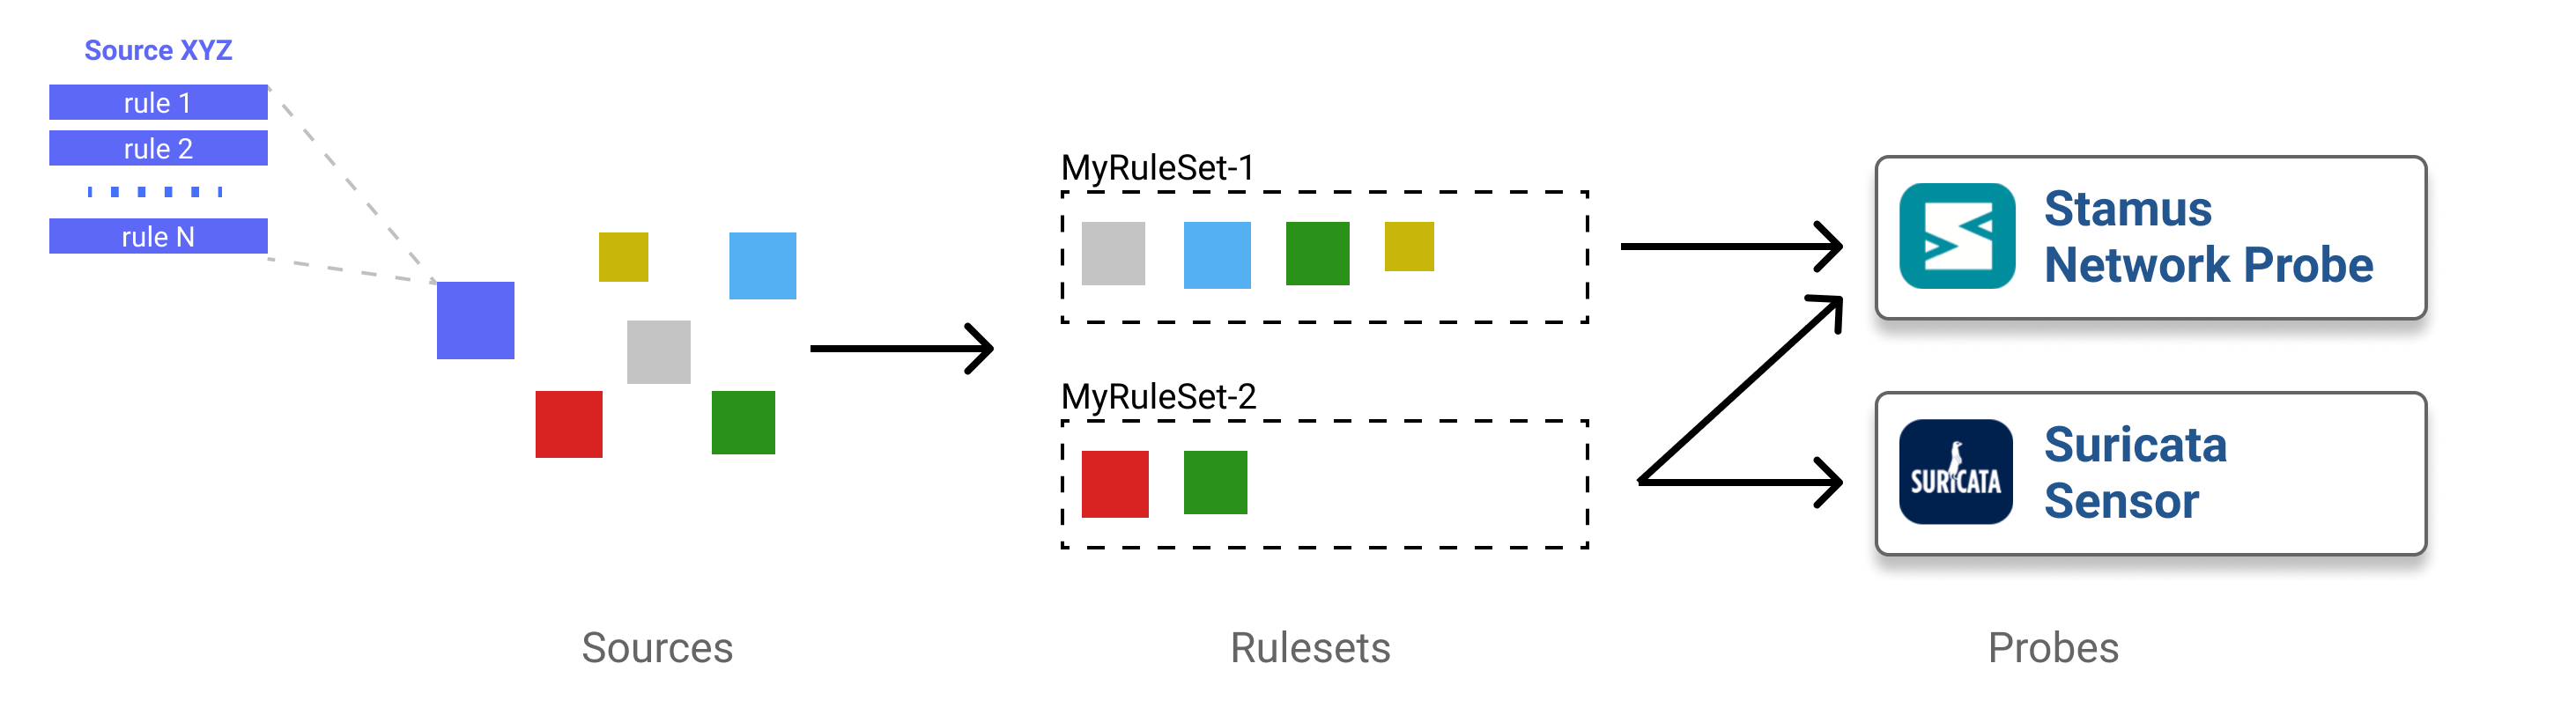
As illustrated by this diagram, the ruleset management encompasses both rulesets and sources. Those can be configured and are accessible through the main menu.

To create a ruleset, you thus must create a set of Sources and then link them to the
ruleset. Once this is done, you can select which elements of the source you want to
use. For example, in the case of a signature ruleset, you can select which categories
you want to use and which individual signature you want do disable.
Once a Ruleset is defined, you can attach it to a Probe through the main menu Appliances. To do that simply edit
the Probe object and choose the Ruleset in the list under the Basic tab.
Note
If you are a SELKS user, the menu Appliances won’t be accessible to you. Instead, use the Suricata menu.
Definitions
Rule or Signature
A rule, or a signature, is used by Suricata to inspect traffic and detect threats, or misconfiguration, based on various criteria to raise alerts.
A signature looks like the following example:
drop tcp $HOME_NET any -> $EXTERNAL_NET any (msg:”ET TROJAN Likely Bot Nick in IRC (USA +..)”; flow:established,to_server; flowbits:isset,is_proto_irc; content:”NICK “; pcre:”/NICK .*USA.*[0-9]{3,}/i”; reference:url,doc.emergingthreats.net/2008124; classtype:trojan-activity; sid:2008124; rev:2;)
See also
To create your own Suricata rules, please refer to Suricata documentation.
Source
A source reference a set of rules, usually downloaded from third-party services, paid or free. When a source containing signatures is splitted in multiple files, the set of signatures in each individual file is called a category.
For example, https://sslbl.abuse.ch/blacklist/ja3_fingerprints.rules is an example of a free to use source of Suricata rules from Abuse.ch.
Ruleset
A ruleset is a collection of sources that aggregate rules. Any ruleset must contains at least one source and can contains as many sources as needed. Similarely, a ruleset can be deployed on one or multiple Stamus Network Probes or Suricata sensors.
There are no limitations in the number of rulesets one may create and transformations such as disabling a specific signature or altering its content can occur before pushing the ruleset to a probe.
Sources
There are two methods to create a Source. First one is to use predefined public sources and the second one - via manual addition.
Adding a Public source
Go to Sources -> Add Public Source (Add being in the Actions menu in the sidebar).
Choose a source and click on the Add button. In the popup you can select to which ruleset you
want to add the source. In some cases there will be some fields like the secret key provided by
the rules editors to be entered.
Adding a Manual source
To create a Source go to Sources -> Add Custom Source (Add being in the
Actions menu in the sidebar). Then set the different fields and click Submit.
A source of datatype Signatures files in tar archive has to follow some rules:
It must be a tar archive
All files must be under a
rulesdirectory
For example, if you want to fetch ETOpen Ruleset for Suricata 4.0, you can use:
Name: ETOpen Ruleset
URI: https://rules.emergingthreats.net/open/suricata-4.0/emerging.rules.tar.gz
A source of datatype Individual signature files has to be a single file containing
signatures.
For example, if you want to use SSL blacklist from abuse.ch, you can use:
Name: SSLBL abuse.ch
A source of datatype Other content has to be a single file. It will be copied
to Suricata rules directory using its name as filename.
If method is HTTP URL, you will see an Optional authorization key field. This
field is optional and can be used to authenticate SCS against the remote server.
It adds an authorization header to HTTP request allowing authentication on a large number of
third party services.
This can be used in particular to import signatures from a MISP instance. See
MISP documentation for more information.
The usage of private Github repositories to host signatures is also supported through the usage of Optional authorization key, as explained in the Github documentation. Optional authorization key should be filled with token TOKEN, with the second TOKEN being the personal access token created under the user Github profile, Developer Settings page.
Updating a Source
To update a Source, you first need to select it. To do that, go to Sources then
select the wanted Source in the array.
You can then click on Update in the menu in the sidebar. This step can take long
as it can require some download and heavy parsing.
Once updated, you can browse the result by following links in the array.
Rulesets
Creating a Ruleset
To create a Ruleset go to Ruleset -> Add (Add being in the
Actions menu in the sidebar). Then set the name of the Ruleset
and choose which Sources to use and click Submit.
You can select the Sources to use and the transformations to apply. For more informations about them, see Rule Transformations.
Updating Rulesets
To update a ruleset, one can choose a combination of the ruleset(s) to update and on which appliance(s) this update will happen.
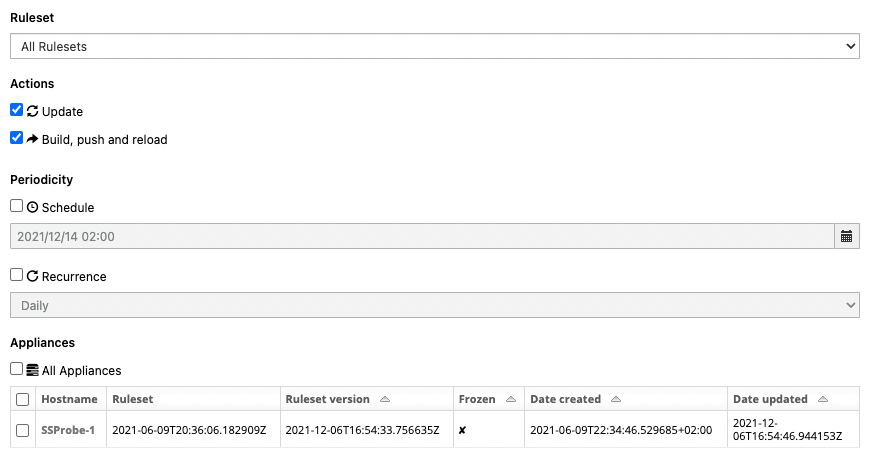
First, select the ruleset you want to update or the shortcut All Rulesets. If you select All Rulesets, this will also include any subsequent Rulesets that will be created later on. If you select a specific Ruleset, only the network probes on which this Ruleset is attached to will be displayed under the Appliances selection menu.
Then, decide what actions to perform:
Update: to download the latest version of the Sources used by the Ruleset. This action is performed by Stamus Central Server.
Build, Push & Reload: to upload the ruleset to the target Appliances and trigger a Suricata reload.
If you selected a specific ruleset, you will also have the option to perform a ruleset rollback by choosing a previous ruleset version.
Note
A ruleset rollback is used when a given ruleset has errors and one must rollback to a previous version the time to fix the error and avoid behind without detection during the fix period. Stamus Central Server keeps the 20 latests rulesets and when Network Probes use a rolled back version of a ruleset they enter a Frozen state which implies that no scheduled tasks will run until the Network Probes are set back to the latest running ruleset.
For the periodicity, decide if you want to run this update at a specified time and/or regularly.
Hint
To ensure your Network Probes receive frequent updates and keep their detection up to date, create at least one scheduled task, ideally once a day, to update and push rulesets to all appliances.
Finally, select the Appliances concerned by this update. When creating a scheduled or recurring tasks note there is a difference between selecting All Appliances and manually selecting ‘all available appliances’.
Important
When we check the All Appliances checkbox, this implies that all existing appliances will be concerned by this update, and will also include any new network probe that will be added later on. This is convenient as it won’t require us to update this update task. However, if you manually selected each network probes appliances, only the selected appliances will be updated even if new network probes are added later on. For example, if a deployment has 2 network probes and those 2 network probes are selected, only those 2 network probes will be updated, regardless of how many network probes that will be added later.
Scheduled Tasks
Tasks like update of rulesets can be scheduled in when defined. The schedule and recurrence option is available during the definition of tasks.
To see the list of scheduled tasks, go to Appliances -> Scheduled tasks.
To access to the detailed info on a specific task, click on its ID in the array. From
this page you can also delete the task by using the delete link in the side bar.
Editing a Ruleset
To edit a Ruleset, you first need to select it. To do that, go to Ruleset then
select the wanted Ruleset in the array.
You can then click on Edit in the Action menu in the sidebar.
There is now different operations available in the Action menu
Edit sources: select which sources of signatures to use in the Ruleset
Edit categories: select which categories of signatures to use in the Ruleset
Add rule to disabled list: if a rule is in this list then it will not be part of the generated Ruleset
Remove rule from disabled list: this remove a rule from the previously mentioned list thus re-enabling it in the Ruleset
NOTE You should have in mind, that if you are editing a ruleset to add a new source to it, then it is mandatory that you do both steps:
edit sources -> add the sources you wish
edit categories -> enable the categories you wish
Otherwise, if you don’t enable the categories of your source, you will have an empty Ruleset.
Edit Sources
To select which Sources to use, just select them via the checkbox and click on Update sources. Please
note that selecting categories to enable is the next step in the process when you add a new source.
Edit Categories
To select which Categories to use, just select them via the checkbox and click on Update categories.
Add rule to disabled list
Use the search field to find the rule(s) you want to remove, you can use the SID or any other element in the signature. SCS will search the entered text in the definition of signature and return you the list of rules.
You will then be able to remove them by clicking on the check boxes and clicking on Add selected rules to disabled rules list.
Remove rule from disabled list
To remove rules from disabled list, simply check them in the array and click on Remove select rules from disabled rules list.
Suricata Sensors
Setup
The Suricata edit page allows you to setup the parameters of the Suricata.
The parameters are the following:
Name: hostname of the probe, be sure it is matching value of host field in JSON events
Descr: description of the suricata
Rules directory: scirius.rules file will be created in this directory. Suricata must only use this file
Suricata configuration file: used to detect some configuration settings
Ruleset: choose the ruleset to use
Updating Suricata Ruleset
To update Suricata ruleset, you can go to Suricata -> Update (Update being in the
Actions menu). Then you have to select which action you want to do:
Update: download latest version of the Sources used by the Ruleset
Build: build a Suricata ruleset based on current version of the Sources
Push: trigger a Suricata reload to have it running with latest build ruleset
You can also update the ruleset and trigger a Suricata reload by running
python manage.py updatesuricata
Using Custom Rules
Initial Configuration
It is possible to use your own signatures in SCS. To do so you can use any of the method available to during source creation.
The most common and easiest way is to use a single file containing the signatures you want to add.
To do so, you need to a source of datatype Individual signature files and choose the upload method. The file containing the signatures
will be uploaded from your system.
You now have to update or create a ruleset so it is using your custom source. To do so select a ruleset and click on Edit then choose edit sources. Add the source to the list of used sources and apply.
The source is now used by the ruleset but it has no categories activated. So you need to edit the ruleset
and click on Edit categories. There select the only category available for your newly added source.
Once done you can push the new ruleset to the probes.
Rules File Update
Upload managed file are not updated during ruleset update. To trigger an update, you need to Edit the source and
upload a new file.
Then you can apply the ruleset to the selected probee.
Testing the Ruleset
SCS is testing sources at upload but you can test them before the upload.
To test your signature file you currently need to get access to a probe running Suricata.
On the probe you can run:
suricata -S custom.rules -T -l /tmp/
The
-Sis asking Suricata to only load the custom.rules file.The
-Tis to run the configuration test mode.
The output is the following when there is a failure:
[15150] 2/7/2015 -- 17:23:12 - (detect-parse.c:613) <Error> (SigParseProto) -- [ERRCODE: SC_ERR_UNKNOWN_PROTOCOL(124)] - protocol "ctp" cannot be used in a signature.  Either detection for this protocol supported yet OR detection has been disabled for protocol through the yaml option app-layer.protocols.ctp.detection-enabled
[15150] 2/7/2015 -- 17:23:12 - (detect.c:370) <Error> (DetectLoadSigFile) -- [ERRCODE: SC_ERR_INVALID_SIGNATURE(39)] - error parsing signature "alert ctp any any -> any any (msg:"SCTP Suricata test 3"; content:"|00 07 02 10|"; offset:0; depth:4; classtype:attempted-admin; sid:3; rev:1; )" from file sctp.rules at line 1
[15150] 2/7/2015 -- 17:23:12 - (detect.c:425) <Warning> (ProcessSigFiles) -- [ERRCODE: SC_ERR_NO_RULES(42)] - No rules loaded from sctp.rules
[15150] 2/7/2015 -- 17:23:12 - (detect.c:498) <Warning> (SigLoadSignatures) -- [ERRCODE: SC_ERR_NO_RULES(42)] - No rules loaded from sctp.rules
[15150] 2/7/2015 -- 17:23:12 - (detect.c:508) <Warning> (SigLoadSignatures) -- [ERRCODE: SC_ERR_NO_RULES_LOADED(43)] - 2 rule files specified, but no rule was loaded at all!
[15150] 2/7/2015 -- 17:23:12 - (suricata.c:1947) <Error> (LoadSignatures) -- [ERRCODE: SC_ERR_NO_RULES_LOADED(43)] - Loading signatures failed.
Threat Intelligence Sources for Datasets
You can add a Threat Intel Source for Datasets. Such sources are string per line dataset files in txt format. The datasets sources can be:
Domains
HTTP user agents
HTTP hostnames
HTTP URLs
TLS SNI
TLS issuer
TLS subject
JA3
In order to do this, you first need to configure your Probes, then upload your dataset file and your rule file as a Custom Source. To do so:
Configure each Probe:
Go on Appliances page in SCS Management app
Click on
Edit probeto change Probe’s configurationGo to
Expert modetab ->YAML to include in suricata configurationAdd the configuration, as follows:
Example
datasets:
  dns-notseen:
    type: string
    load: top1mdomains.dataset
    hash:
      memcap: 150mb
      hash-size: 1000000
Submit and
Apply changeson Probe
Note
The name in load must be the sane as the name of the dataset source.
You need to add your
datasetfile as a Custom source:
Go to Sources page
Click on
Add Custom Source, underActionsName your custom dataset (in the example above, it is named
top1mdomains.dataset, so you should name the Custom source the same way)Under
Method, selectUploadUnder
Datatype, selectString dataset fileAdd it to a Ruleset by selecting the relevant checkbox
Submit
Add a relevant
rulethat uses the name of the newdataset-based source. You can either add it viaHTTP urlor viaUpload.
Note
You should use the same name for the rule, as the name you’ve given to your dataset source in Step 2 and in the YAML to include in suricata configuration in Step 1.
Note
For both custom source addition types (http url or upload), you should select Individual Signatures file as Datatype
Example rule
alert dns any any -> any any (msg:"Stamus Networks Detection - Unusual Domains"; dns.query; dataset:isnotset,dns-notseen; threshold: type limit, track by_src, seconds 7200, count 1; sid:1910010;)
Update and push the Ruleset on Probe
Suppression and Thresholding
Alert numbers for a particular signature can be controlled through suppression or thresholding.
Thresholding is usually used when number of alerts needs to be minimized - as for example maximum 1 alert per minute from that source or destination IP for that signature.
Suppression is used when the alerts need to be suppressed - aka do not generate alerts for that particular signature from that source or destination IP.
Suppress Alerts per Rule
From any table displaying a list of alerts, click on the particular sid for the alerts that would need to be suppressed. This will
display the rule page. There you can click on Edit rule under Action on the menu on the left hand side, then select Suppress rule in the same menu.
From the rule page you can also reach the suppression creation page by being on the Ip and Time stats or Advanced Data tabs and clicking on
the x next to the IP address.
On the new page you will be informed if there already is some threshold or suppression in effect for that particular signature. The available fields are:
Rulesetfor which ruleset this configuration appliesTrack by(mandatory field) to track by source or destination IPNetfor which IP and/or particular network is that valid.
Choose the ruleset , source or destination (for that particular IP) and click +Add.
You should also choose to enforce the suppression for a whole network and/or use a list of IPs. You can add in the Net field like so:
10.10.10.0/24,1.1.1.1,2.2.2.2
Note
Adding the network for a relevant suppression, is mandatory.
You can verify the suppression by clicking on the Rules info tab. You will have an informational display about the status of the different (if any) threshold and suppression configurations.
Alternatively you can also view that by clicking Rulesets and selecting the ruleset for which you have applied the particular suppression or threshold.
In order for the suppression to become active you need to Push the updated ruleset to the probes.
Remove Rule Suppression
If you wish to remove a Suppress action on a rule and be able to get alerts for the Signature, you need to:
go on rule information page, by searching for the rule sid
click on the rule SID link on the Rules table
go on Information tab
in the Suppresion table, click on the ID of the rule
once redirected, click on
Deletelink underActionspanel on the leftdo an Update/push on the ruleset to make sure changes will be applied on the Ruleset on Probe
Threshold Alerts
From any table displaying a list of alerts, click on the particular sid for the alerts that would need to be suppressed. This will
display the rule page. There you can click on Edit rule under Action on the menu on the left hand side, then select Threshold rule in the same menu.
From the rule page you can also reach the threshold creation page by being on the Ip and Time stats or Advanced Data tabs and clicking on
the arrow down (next to the x) next to the IP address.
On the new page you will be informed if there already is some threshold or suppression in effect for that particular signature. The available fields are:
Typetype of the threshold, one of:limit- limits the alerts to at most “X” times.threshold- minimum threshold for a rule before it generates an alert.both- both limiting and thresholding are applied.
Rulesetfor which ruleset this configuration appliesTrack by(mandatory field) to track by source or destination IPCountnumber of times the alert is generated.Secondswithin that timespan
You can verify the thresholding by clicking on the Rules info tab. You will have an informational display about the status of the different (if any) threshold and suppression configurations.
Alternatively you can also view that by clicking Rulesets and selecting the ruleset for which you have applied the particular suppression or threshold.
In order for the threshold to become active you need to Push the updated ruleset to the probes.
Rule Transformations
There is three types of rules transformations. The first one Action allows the action of a particular rule to be changed - to drop, reject or filestore. Please note these actions requires advanced knowledge about rules and the rule keywords language. Second one is Lateral that modify the rules to detect lateral movement and third one is Target that update signatures by adding the target keyword.
Transformation are relative to a ruleset. But they can be set globally on a ruleset or set on a category or on a specific rule. So it is easy to handle exceptions.
Action Transformation
Once you have a particular rule that you would like to transform - in the rule’s details page on the left hand side panel under Actions click
Transform rule. You will be presented with a few choices:
Type of transformation to choose form:
drop- (IPS mode) will convert the rule from alert to drop - aka IPS mode needs to be explicitly set up and configured before hand.reject- (IDPS/hybrid) will convert the rule from alert to reject meaning that when triggered a RST/or dst unreachable packets will be send to both the src and dst IP.filestore- will convert those rules only that have protocols allowing for file extraction - for examplealert http...oralert smtpChoose a ruleset you wish the newly transformed rule to be added/registered in.
Note
A particular rule can be transformed only once.
Note
For using the drop functionality you need to have a valid IPS setup.
After you make the desired selection you can add in a comment for the purpose of accountability and click on Valid.
You will have the details about the transformed rule in the Information tab. You can review and confirm the transformation and the ruleset it is add in alongside any comments.
Only rules that are active can be transformed. If a rule is not active in a particular ruleset it will not have the transformation or
suppress/threshold options available on the left hand side panel. To make it active you can toggle the availability of that rule by clicking
on the Toggle availability option on the left hand side panel menu.
The history tab of the rule details page will have any comments and changes to the transformed rule for traceability.
Lateral Movement
Signatures are often written with EXTERNAL_NET and HOME_NET variables. As a consequence, it means that they won’t match if both sides of a flow are within a single area, for example HOME_NET. Thus, lateral movements won’t be detected.
The Lateral transformation helps solving this issue by replacing EXTERNAL_NET by any in applicable signatures, and so detects lateral movement within a single network area.
This option have three values:
No,
EXTERNAL_NETsubstitution isn’t performed, leaving it untouchedYes,
EXTERNAL_NETis replaced byanyin all casesAuto,
EXTERNAL_NETis replaced byanyunder some circumstances
Note
Replacing EXTERNAL_NET by any in all cases can lead to a flood of alerts depending on the rules deployed in your environment.
When choosing Auto, the substitution will only be performed on signatures having the metadata field with the key deployment set to Internal or Datacenter. In all cases, the substitution will not be performed for ET POLICY signatures as they will generate a high level of noise, regardless of the usage of the key deployment.
alert http $HOME_NET any -> $EXTERNAL_NET any (msg:"ET MALWARE Suspected Powershell Empire POST M1"; flow:to_server,established; http.method; content:"POST"; http.uri; content:".php"; endswith; http.cookie; content:"session="; depth:8; http.header_names; content:"Cookie|0d 0a|User-Agent|0d 0a|Host|0d 0a|"; classtype:trojan-activity; sid:2027283; rev:4; metadata:affected_product Windows_XP_Vista_7_8_10_Server_32_64_Bit, attack_target Client_Endpoint, created_at 2019_04_25, deployment Perimeter, former_category TROJAN, malware_family PowerShell_Empire, signature_severity Major, updated_at 2020_09_17;)
For example, the above signature uses EXTERNAL_NET and set the deployment key to Perimeter. So, if Auto is activated, this rule won’t be mutated to use any instead of EXTERNAL_NET.
Target Keyword
Available since Suricata 4.0, the target keyword can be used to tell which side of a flow triggering a signature is the target. If this key is present then related events are enhanced to contain the source and target of the attack.
The option can have four values:
Auto: an algorithm is used to determine the target if there is one
Destination: target is the destination IP
Source: target is the source IP
None: no transformation is done